Last week, I learned that lifetimemoments was going to close its doors at the end of this year. I have been blessed to have been designing for LM for many years now - since September, 2005. To say that I love the store, and its owners Jackie and Thad, is an understatement. They are the epitome of grace and generosity, and ran Lifetimemoments with kindness, beauty and love. I am so sad for what the closing represents for Jackie and Thad, although I am 100% confident that life has good things in store for them that will unfold as they move forward. I will miss the community, and the closeness of our design team. We have celebrated babies, promotions, adoptions, moves, marriages, deployments and safe returns, birthdays, and everything else possible in between. While we will always stay in touch and be friends, a part of me recognizes that it will not be the same and how much I will miss logging in every day for my LM fix. I was telling my DH how it felt like someone close to me died. How crazy is that? But my beloved LM. How I will miss you. I wish Jackie and Thad the very very best.
For everyone - there is an awesome liquidation sale going on through December 10. Be sure to stop by Lifetimemoments.
Showing posts with label lifetimemoments. Show all posts
Showing posts with label lifetimemoments. Show all posts
Tuesday, November 17, 2009

Wednesday, November 11, 2009
crop day - share3
Using the Indian Summer collection by Basic Grey, and a lot of Prima from my stash.
TFL. Wendy

(I design for lifetimemoments)
TFL. Wendy

(I design for lifetimemoments)
Tuesday, November 10, 2009
crop day - Share2
Using the Afternoon Tea collection from Scrap Within Reach; finally got my hands on this Ali Edwards Technique Tuesday set as well.
TFl. Wendy


(I design for Lifetimemoments)
TFl. Wendy


(I design for Lifetimemoments)
Monday, November 9, 2009
crop day - share1
I went to an all day crop on Saturday, and oh, did I need it!! It is amazing to me how spending a day creating with friends does so much to help re-set my head. I got a ton of work done, and will be sharing some throughout the week (not all, though, as some layouts are of pictures that I don't normally post on the web).
My first two are my favorites from the weekend.
1) Love, nai nai
Photograph by Araxi Dertavitian
Paper line is Kaisercraft Loire Valley

2) All Boy
This is one of those paper lines that when I first received it, I was intimidated.

But I find that with really strong prints, breaking it up and using it in bits with lots of negative space usually does the trick. I love how this turned out.
Paper is GCD Studios, Vintage Boy

TFL. Wendy
(I design for lifetimemoments)
My first two are my favorites from the weekend.
1) Love, nai nai
Photograph by Araxi Dertavitian
Paper line is Kaisercraft Loire Valley

2) All Boy
This is one of those paper lines that when I first received it, I was intimidated.

But I find that with really strong prints, breaking it up and using it in bits with lots of negative space usually does the trick. I love how this turned out.
Paper is GCD Studios, Vintage Boy

TFL. Wendy
(I design for lifetimemoments)
Saturday, November 7, 2009
tutorial - lace paper and color mists
A quick tip - flip over the theme cutout of a piece of lace cardstock, and use it as a stencil with the Tattered Angels spray

 When you remove the template, it is very subtle effect


TFl. Wendy
(I design for Lifetime Moments)

 When you remove the template, it is very subtle effect

On its own, however, it is still too flat to anchor the layout on its own. Create an unusual border, and add visual interest, by disrepecting the edges of your page - take care that whatever you add over the edge of the flower of the die cut paper base, that it still will fit into your page protector - but within those dimensions, you really can add a lot by simply going over and above the edges. Here I just used the themed cutout, only at the cutout part of the paper and edged it up to the top left - now, that, and the sprayed bottom right, form a very rough frame for my photo.

TFl. Wendy
(I design for Lifetime Moments)
Saturday, October 31, 2009
happy halloween!!
Happy halloween everyone!!
Stamps by Sugar Nellie, Gorjuss
Sketch is LMCS52

(I design for Lifetimemoments)
Stamps by Sugar Nellie, Gorjuss
Sketch is LMCS52

(I design for Lifetimemoments)
Friday, October 16, 2009
lifetimemoments reveal 10-16
Happy friday everyone!!
This week at LM we're focusing on fall themes... I'm playing catchup in with my books lately, and been working on 2007....
1) pick of the patch
playing with the Autumn Bliss line from My Little Yellow Bicycle and uses stamps from Unity Stamp Company the September 09 KOTM (pumpkin) Go Ahead Wish and the Lovely Lilacs background stamp.

2) Autumn Days
My second project works with the Indian Summer release from Basic Grey. The maya road envelope is stamped with the Grainy Background stamp from Unity Stamp Company

TFL!! Wendy
(I design for Lifetimemoments)
This week at LM we're focusing on fall themes... I'm playing catchup in with my books lately, and been working on 2007....
1) pick of the patch
playing with the Autumn Bliss line from My Little Yellow Bicycle and uses stamps from Unity Stamp Company the September 09 KOTM (pumpkin) Go Ahead Wish and the Lovely Lilacs background stamp.

2) Autumn Days
My second project works with the Indian Summer release from Basic Grey. The maya road envelope is stamped with the Grainy Background stamp from Unity Stamp Company

TFL!! Wendy
(I design for Lifetimemoments)
Sunday, October 11, 2009
copic master color turnaround
Sometimes I use a color combination that I just love - or see it on someone else's card. I had been jotting them down on yellow postie pads but that has quickly gotten unworkable. After having made the hair/skin colorboard, I realized that there was no reason I couldn't so something similar for my favorite combinations. I wanted something easy to flip through and use as a reference. This Maya Road Small Calendar Stand was perfect. Not too big such that it takes up too much room, it was the perfect size and scale for my desktop.
I fully expect this to become very full eventually, and so I did not want to bulk it up too much. I set aside only two of the thick chipboard inserts to act as dividers for "warm" color charts and "cool" color charts, and quickly covered them with some scrap paper.

Next, cut several insert pages to 3"x3.75" from your favorite "use with COPIC" cardstock. Mine is Prism's Simply Smooth Cardstock.
Stamp multiples of the same easy to color stamp using your favorite "use with COPIC" ink - Mine is Memento Tuxedo Black. The stamp is from Unity Stamp Company's September 2009 Kit of the Month. I like to use the same image throughout, because it really highlights the color differences better, IMO.

Then, simply experiment with your favorite color combinations. These are a combination of my own favorites, suggestions from others in the LM stamping forum, and from me surfing the web for my favorite copic artists (many will post their color combinations with their creations). Note that these are not fully colored, nor are they all that CAREFULLY colored as to the smaller details - my goal was to catch a blend only for reference sake, not to create a perfectly colored image.


a quick, but FLAT decoration on the cover finishes the project. (I want it flat so I can maximize the insert page space).

Then its just a quick flip to find my favorite for whatever paper I'm working with. Extra pages are clipped to the back for easy access when I come across a new combination I want to memorialize.

Right now, I really struggle with yellows and pinks, and so, plan on surfing to see what others have done.
I hope this helps... TFL. Wendy
(I design for Unity Stamp Company and Lifetimemoments)
I fully expect this to become very full eventually, and so I did not want to bulk it up too much. I set aside only two of the thick chipboard inserts to act as dividers for "warm" color charts and "cool" color charts, and quickly covered them with some scrap paper.

Next, cut several insert pages to 3"x3.75" from your favorite "use with COPIC" cardstock. Mine is Prism's Simply Smooth Cardstock.
Stamp multiples of the same easy to color stamp using your favorite "use with COPIC" ink - Mine is Memento Tuxedo Black. The stamp is from Unity Stamp Company's September 2009 Kit of the Month. I like to use the same image throughout, because it really highlights the color differences better, IMO.

Then, simply experiment with your favorite color combinations. These are a combination of my own favorites, suggestions from others in the LM stamping forum, and from me surfing the web for my favorite copic artists (many will post their color combinations with their creations). Note that these are not fully colored, nor are they all that CAREFULLY colored as to the smaller details - my goal was to catch a blend only for reference sake, not to create a perfectly colored image.


a quick, but FLAT decoration on the cover finishes the project. (I want it flat so I can maximize the insert page space).

Then its just a quick flip to find my favorite for whatever paper I'm working with. Extra pages are clipped to the back for easy access when I come across a new combination I want to memorialize.

Right now, I really struggle with yellows and pinks, and so, plan on surfing to see what others have done.
I hope this helps... TFL. Wendy
(I design for Unity Stamp Company and Lifetimemoments)
Sunday, September 27, 2009
tutorial - altered hair accessory holder
A pretty hair accessory holder for the pretty little girls in your life.
Supplies:
Prima mulberry paper, printed paper, and flowwrs on the vine
Lace
Kaiser Craft panorama frame

Remove your mulberry paper from the packaging and crinkle it up a couple of times to really soften it up.

When you uncrinkle it, it is much softer - almost like fabric...

Open your frame and take the top part.


I chose this mulberry paper because it is prestitched, such a pretty detail for an altered (nonstitchable) item. randomly place your frame over the stitched parts until you get a positioning that you like. For me, that happens to be the bottom half of this particular sheet. Cut the top half off and put aside.

Apply mod podge liberally over the top of the frame - really liberally - you want a lot of contact between the mulberry and the frame. (I used the packaging from the mulberry paper to protect my work surface from all the dripping glue)


Smooth the bottom half of your mulberry paper onto the top of the frame and use your hands, a brayer, a credit card side, whatever you wish to get complete adhesion on the top. Let it sit for like 10 minutes, to give the glue some time to cure and react with the mulberry paper.

 Cut some openngs in the middle part. Take a spray bottle, a wet paint brush, or whatever works for you, and wet the mulberry paper where the paper meets the edges of your frame. Get it nice and damp

Mulberry paper is very malleable when it is damp. Just pull it either upwards or downwards [u]over[/u] each edge - the hard edge acts as a bit of cutter with the damp paper, and it'll easily just tear apart.

continue around ever edge if your frame - you'll end up with this pretty feathery edging.

(if the feathery-ness bothers you, take your mod podge and go over the edges and wrap it under - the mulberry is very manipulable when wet.) Set aside to dry.
Now take your bottom part of the frame, and adhere to the middle text part of the Prima paper - I used a glue stick. Let sit for a few minutes, them trim away the excess with an exacto blade.


With your cropodile, punch two holes about a third of the way in from each side of the bottom edge of your back framed piece.

cut your lace trim in half, then take each and thread through each hole, hanging down. Secure anyway that you want. Because this was a home dec project, I used a high strength glue gun. Set aside.

Wrap the Prima vine over the top left corner of your frame. With the pre-stitching in the paper, there's little else you need to do ... Adhere your top embellished frame piece to your back frame piece, leaving the trim to hang down underneath. (optional - take some ribbon and glue around all edges to cover where the pieces meet)

The insides is kind of bare. you can put a photo or anything you like to decorate the inside of the frame. I just put a title in. Outline each chipboard letter with a black sharpie.

Voila. You're done. Just add your hair accessories. (the frame has a hole in the back for hanging).


Supplies:
Prima mulberry paper, printed paper, and flowwrs on the vine
Lace
Kaiser Craft panorama frame

Remove your mulberry paper from the packaging and crinkle it up a couple of times to really soften it up.

When you uncrinkle it, it is much softer - almost like fabric...

Open your frame and take the top part.


I chose this mulberry paper because it is prestitched, such a pretty detail for an altered (nonstitchable) item. randomly place your frame over the stitched parts until you get a positioning that you like. For me, that happens to be the bottom half of this particular sheet. Cut the top half off and put aside.

Apply mod podge liberally over the top of the frame - really liberally - you want a lot of contact between the mulberry and the frame. (I used the packaging from the mulberry paper to protect my work surface from all the dripping glue)


Smooth the bottom half of your mulberry paper onto the top of the frame and use your hands, a brayer, a credit card side, whatever you wish to get complete adhesion on the top. Let it sit for like 10 minutes, to give the glue some time to cure and react with the mulberry paper.


Mulberry paper is very malleable when it is damp. Just pull it either upwards or downwards [u]over[/u] each edge - the hard edge acts as a bit of cutter with the damp paper, and it'll easily just tear apart.

continue around ever edge if your frame - you'll end up with this pretty feathery edging.

(if the feathery-ness bothers you, take your mod podge and go over the edges and wrap it under - the mulberry is very manipulable when wet.) Set aside to dry.
Now take your bottom part of the frame, and adhere to the middle text part of the Prima paper - I used a glue stick. Let sit for a few minutes, them trim away the excess with an exacto blade.


With your cropodile, punch two holes about a third of the way in from each side of the bottom edge of your back framed piece.

cut your lace trim in half, then take each and thread through each hole, hanging down. Secure anyway that you want. Because this was a home dec project, I used a high strength glue gun. Set aside.

Wrap the Prima vine over the top left corner of your frame. With the pre-stitching in the paper, there's little else you need to do ... Adhere your top embellished frame piece to your back frame piece, leaving the trim to hang down underneath. (optional - take some ribbon and glue around all edges to cover where the pieces meet)

The insides is kind of bare. you can put a photo or anything you like to decorate the inside of the frame. I just put a title in. Outline each chipboard letter with a black sharpie.

Voila. You're done. Just add your hair accessories. (the frame has a hole in the back for hanging).


Saturday, September 26, 2009
Tutorial - Tattered Angels Handmade Journal
When I first picked up these Tattered Angels Glimmer Mists, my dd was on cloud 9. She played a bit, then one day convinced me to completely tarp up our dining room table and I let her have at it for about an hour. At the end, I had this stack of gorgeous misted pages, and she was messy, but thrilled with her handiwork. Then came the question? What to do with them?
Then it hit me. These looked just like the internal art journal pages that I see on the web. Why not make a journal?
So, since I did not take pictures the first time, I sprayed another page as an example. Spray as many of these as you want, using the cool screen templates that Tattered Angels makes. I sprayed it on the value pack white cardstock. Vary your colors.


When they are all dry, fold them down the middle INWARD, with the imaged sides facing each other. Do this with all of your pages. Now, take two of the pages and put them on top of each other - you will have your 1/2 page,backside facing backside . Because you are adhering the backsides to backsides, what you have left are only the painted sides when you turn the page.


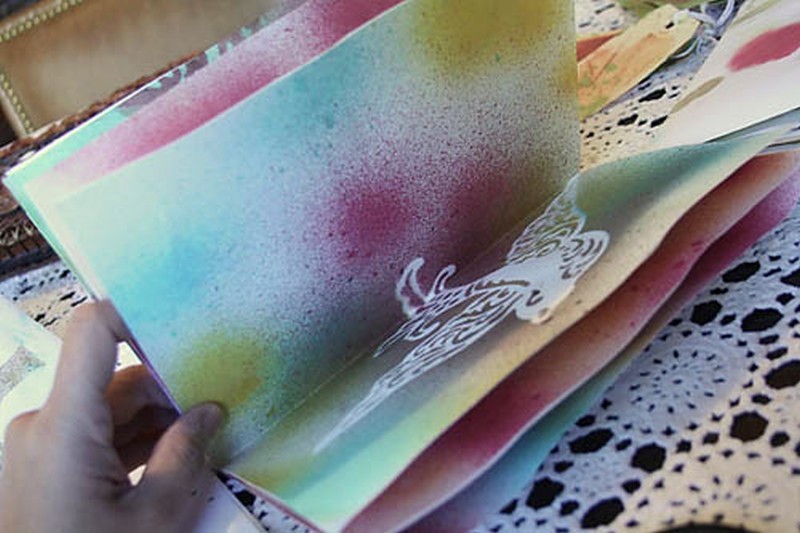
keep adhering pages like this until you have a small stack about 1/4" thick. This is called a signature. The outsides of your signatures will be the backsides of pages - but the internal pages of each signature will be only the painted sides, because you have adhered all of the internal backsides to each other.

Repeat until you have used up all of your pages, setting aside a single sheet to be your cover. You should have a small stack of signatures, plus a single sheet that you cut in half so it now measures 5 1/2 x 8 1/2" (in my picture, my cut "sheet" comprise the blue pages on the bottom).


mark holes approximately 1" apart from each end - this gives you 2 holes on top, 2 holes on the bottom. Next, find the middle of your page then mark 1/2 on each side - now you have two holes in the middle. You should have six holes marked total. hold your cropodile upside down, so you can see your mark in the middle of the hole punchie part of it.

Punch all your holes.

place your nicely punched template on top of the next signature to make matching marks. Punch those holes. Repeat til you are done with all of your signatures.

Take the chipboard that comes with each LM order, and cut 4 pieces the same size as your pages (which are 5 1/2 x8 1/2" (i.e. 1/2 of a letter size sheet of paper). Adhere two pieces to each other for your front cover - repeat for your back cover

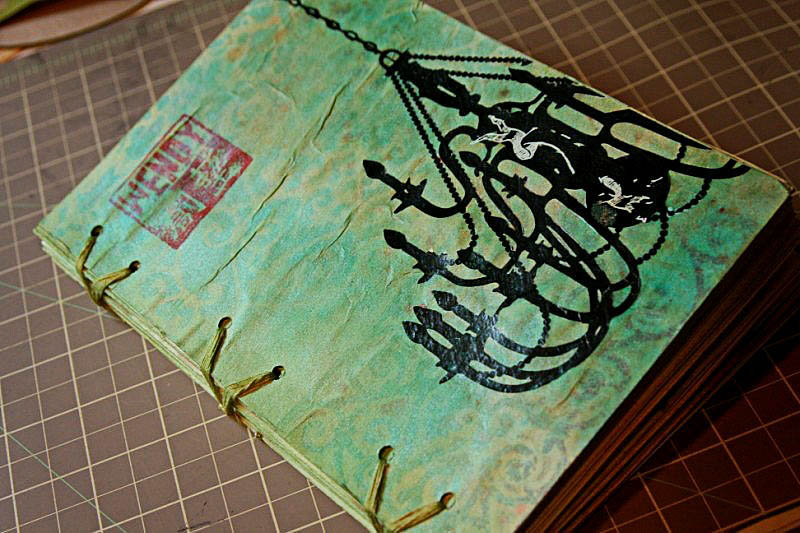
Take that pretty cover piece you set aside and glue to the top of your front cover, and your back cover. Take a signature as a template, and make corresponding holes in the covers. Stack the back cover (print side out), your signatures, then your front cover, so they all line up and you can see through all the holes. Carefully adhere all of your signatures, backside to backside, together. Now you've got a large signature stack, plus a front cover and a back cover.
Now, the sewing.... I used regular crochet thread, double knotted. Up through the first hole on the bottom cover:

go around, pass your needle between the double threads, and pull into a knot.

Put a dollop of glue over the knot, just to secure it.

It doesn't matter if its still wet as you move onto the next step. It'll still dry on the knot.
Take the rest of your stacks and now align your MONGO signatures over the knot you just made in the first signature, and pull your thread through all of the holes in that hole position. Sew through that hole in all of the signatures. Bring your thread to the next hole 1" to the left (your thread is now diagonal), sew through signatures for that hole position, cross thread back over to first hole - now you've made an "x" - repeat 3 times.

Cross your thread under the middle of the "x"

Pass your needle through the middle of the loop, making a small knot in the middle of the "x." Return to first page of your second hole and bring needle through.


open your book and work with the thread from the inside, loop around, pull your needle and thread through the loop to make a knot. Place dollop over this knot like you did in the beginning. Cut thread.

Restring your needle with another double length of thread and repeat for the remaining two pairs of holes. When you are done, your book will be sewn in at the binding in 3 places.


I stamped and embellished it, but looking at it, it was too bright with the blue. And so, i took out the tattered angels mists, and gave it another few spritzes with a gold, and a green. ahhh.. that's what I was looking for - bright and totally antiquey jade looking...


Subscribe to:
Posts (Atom)