Monday, September 28, 2009
COPIC coloring - Skin and Hair Colorboard
I have been floundering recently attempting to use my COPICS to color a blond fair skinned image, as my favorite skin color combination seemed a bit too yellow when I put it next to a yellow marker, which was too flat for pretty hair. I also realized most of my cards feature a fair skinned brunette, since those are the color combinations I seemed to be too comfortable with. And so, I decided to sit down and experiment and create a color board for myself as a guide. I loved how it turned out, so I thought I'd share.
Not alot of text needed, as I think the pictures are self explanatory. All stamps are by Rubber Romance, Jane with her BlingBling. Enjoy, and I hope it helps.
(i design for rubber romance stamps)
Sunday, September 27, 2009
tutorial - altered hair accessory holder
A pretty hair accessory holder for the pretty little girls in your life.
Supplies:
Prima mulberry paper, printed paper, and flowwrs on the vine
Lace
Kaiser Craft panorama frame
Remove your mulberry paper from the packaging and crinkle it up a couple of times to really soften it up.
When you uncrinkle it, it is much softer - almost like fabric...
Open your frame and take the top part.
I chose this mulberry paper because it is prestitched, such a pretty detail for an altered (nonstitchable) item. randomly place your frame over the stitched parts until you get a positioning that you like. For me, that happens to be the bottom half of this particular sheet. Cut the top half off and put aside.
Apply mod podge liberally over the top of the frame - really liberally - you want a lot of contact between the mulberry and the frame. (I used the packaging from the mulberry paper to protect my work surface from all the dripping glue)
Smooth the bottom half of your mulberry paper onto the top of the frame and use your hands, a brayer, a credit card side, whatever you wish to get complete adhesion on the top. Let it sit for like 10 minutes, to give the glue some time to cure and react with the mulberry paper.
Cut some openngs in the middle part. Take a spray bottle, a wet paint brush, or whatever works for you, and wet the mulberry paper where the paper meets the edges of your frame. Get it nice and damp
Mulberry paper is very malleable when it is damp. Just pull it either upwards or downwards [u]over[/u] each edge - the hard edge acts as a bit of cutter with the damp paper, and it'll easily just tear apart.
continue around ever edge if your frame - you'll end up with this pretty feathery edging.
(if the feathery-ness bothers you, take your mod podge and go over the edges and wrap it under - the mulberry is very manipulable when wet.) Set aside to dry.
Now take your bottom part of the frame, and adhere to the middle text part of the Prima paper - I used a glue stick. Let sit for a few minutes, them trim away the excess with an exacto blade.
With your cropodile, punch two holes about a third of the way in from each side of the bottom edge of your back framed piece.
cut your lace trim in half, then take each and thread through each hole, hanging down. Secure anyway that you want. Because this was a home dec project, I used a high strength glue gun. Set aside.
Wrap the Prima vine over the top left corner of your frame. With the pre-stitching in the paper, there's little else you need to do ... Adhere your top embellished frame piece to your back frame piece, leaving the trim to hang down underneath. (optional - take some ribbon and glue around all edges to cover where the pieces meet)
The insides is kind of bare. you can put a photo or anything you like to decorate the inside of the frame. I just put a title in. Outline each chipboard letter with a black sharpie.
Voila. You're done. Just add your hair accessories. (the frame has a hole in the back for hanging).
Saturday, September 26, 2009
Tutorial - Tattered Angels Handmade Journal
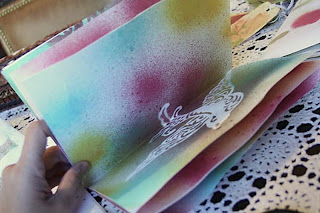
When I first picked up these Tattered Angels Glimmer Mists, my dd was on cloud 9. She played a bit, then one day convinced me to completely tarp up our dining room table and I let her have at it for about an hour. At the end, I had this stack of gorgeous misted pages, and she was messy, but thrilled with her handiwork. Then came the question? What to do with them?
Then it hit me. These looked just like the internal art journal pages that I see on the web. Why not make a journal?
So, since I did not take pictures the first time, I sprayed another page as an example. Spray as many of these as you want, using the cool screen templates that Tattered Angels makes. I sprayed it on the value pack white cardstock. Vary your colors.
When they are all dry, fold them down the middle INWARD, with the imaged sides facing each other. Do this with all of your pages. Now, take two of the pages and put them on top of each other - you will have your 1/2 page,backside facing backside . Because you are adhering the backsides to backsides, what you have left are only the painted sides when you turn the page.
keep adhering pages like this until you have a small stack about 1/4" thick. This is called a signature. The outsides of your signatures will be the backsides of pages - but the internal pages of each signature will be only the painted sides, because you have adhered all of the internal backsides to each other.
Repeat until you have used up all of your pages, setting aside a single sheet to be your cover. You should have a small stack of signatures, plus a single sheet that you cut in half so it now measures 5 1/2 x 8 1/2" (in my picture, my cut "sheet" comprise the blue pages on the bottom).
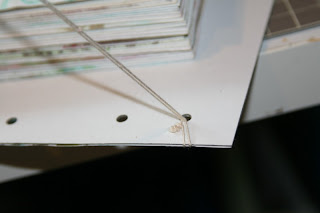
mark holes approximately 1" apart from each end - this gives you 2 holes on top, 2 holes on the bottom. Next, find the middle of your page then mark 1/2 on each side - now you have two holes in the middle. You should have six holes marked total. hold your cropodile upside down, so you can see your mark in the middle of the hole punchie part of it.
Punch all your holes.
place your nicely punched template on top of the next signature to make matching marks. Punch those holes. Repeat til you are done with all of your signatures.
Take the chipboard that comes with each LM order, and cut 4 pieces the same size as your pages (which are 5 1/2 x8 1/2" (i.e. 1/2 of a letter size sheet of paper). Adhere two pieces to each other for your front cover - repeat for your back cover
Take that pretty cover piece you set aside and glue to the top of your front cover, and your back cover. Take a signature as a template, and make corresponding holes in the covers. Stack the back cover (print side out), your signatures, then your front cover, so they all line up and you can see through all the holes. Carefully adhere all of your signatures, backside to backside, together. Now you've got a large signature stack, plus a front cover and a back cover.
Now, the sewing.... I used regular crochet thread, double knotted. Up through the first hole on the bottom cover:
go around, pass your needle between the double threads, and pull into a knot.
Put a dollop of glue over the knot, just to secure it.
It doesn't matter if its still wet as you move onto the next step. It'll still dry on the knot.
Take the rest of your stacks and now align your MONGO signatures over the knot you just made in the first signature, and pull your thread through all of the holes in that hole position. Sew through that hole in all of the signatures. Bring your thread to the next hole 1" to the left (your thread is now diagonal), sew through signatures for that hole position, cross thread back over to first hole - now you've made an "x" - repeat 3 times.
Cross your thread under the middle of the "x"
Pass your needle through the middle of the loop, making a small knot in the middle of the "x." Return to first page of your second hole and bring needle through.
open your book and work with the thread from the inside, loop around, pull your needle and thread through the loop to make a knot. Place dollop over this knot like you did in the beginning. Cut thread.
Restring your needle with another double length of thread and repeat for the remaining two pairs of holes. When you are done, your book will be sewn in at the binding in 3 places.
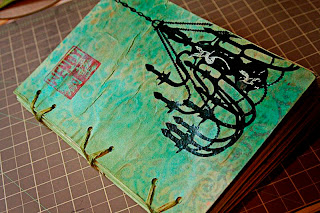
I stamped and embellished it, but looking at it, it was too bright with the blue. And so, i took out the tattered angels mists, and gave it another few spritzes with a gold, and a green. ahhh.. that's what I was looking for - bright and totally antiquey jade looking...
Subscribe to:
Posts (Atom)


